Updated for 2025: This guide has been refreshed with updated techniques, expert insights, and practical tips to help you achieve a long-lasting and professional German smear finish.
A brick exterior is a striking architectural feature, but some homeowners prefer a rustic, aged look that evokes old European charm. German smear offers a cost-effective way to transform plain brick into a weathered, vintage-style surface, giving homes a warm and inviting character.
Beyond aesthetics, German smear has practical benefits. Unlike paint, it allows bricks to breathe, preventing trapped moisture and reducing the risk of mold or mildew. It also forms a durable protective layer, helping bricks resist wear and tear while requiring little maintenance.
If you’re considering other brick treatments, you may want to explore Whitewashing Bricks or Limewashing Bricks for different finishes.
What is German Smear and How Does It Work?
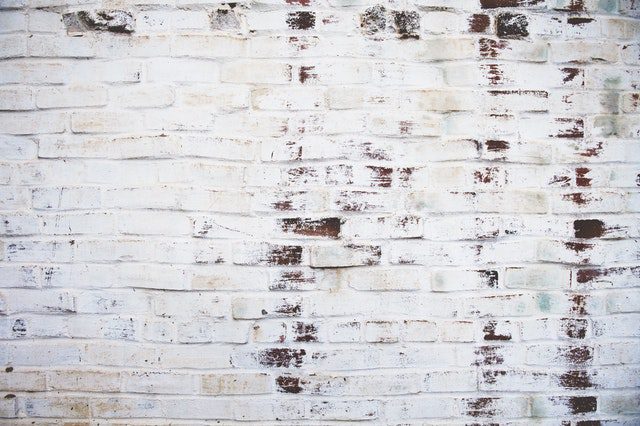
Originating in Northern Germany, German smear or mortar wash is a technique where a wet mortar mix is applied to brick and then partially wiped off before drying. This creates an uneven, textured finish with some bricks exposed while others are covered in a softened white hue. The final look can be adjusted based on the amount of mortar applied and how much is removed during the process.
One key consideration is brick compatibility. German smear works best on raw, unpainted brick, particularly porous varieties like clay bricks, which absorb the mortar well. If your brick has been previously painted or sealed, this technique won’t adhere properly.
German Smear vs. Other Brick Treatments
Before committing to German smear, it’s useful to understand how it compares to limewash, whitewash, and painted brick. Each option has its unique look and benefits.
- German Smear creates a textured, distressed look that is permanent and does not require maintenance like paint. Unlike limewash or whitewash, it doesn’t fade over time and won’t peel.
- Limewash is a more subtle, blended treatment that allows some of the brick’s natural tones to show through. It is breathable like German smear but requires reapplication over time.
- Whitewash is a thin, watered-down paint that provides a soft, semi-transparent white layer over bricks. However, it tends to wear off faster than German smear or limewash.
- Brick Paint provides solid, opaque coverage, fully covering the brick’s texture and color. While it offers a clean and modern look, it can trap moisture, leading to potential brick damage and the need for frequent repainting.
Each method has its appeal, but German smear stands out for its durability and rustic charm, making it ideal for homeowners seeking a low-maintenance yet high-impact transformation.
Cost of German Smear: DIY vs. Professional Application
Many homeowners choose to DIY their German smear because the materials are relatively inexpensive. An 80-pound bag of premixed mortar costs around $50–$80 and can cover approximately 350 sq. ft. With three bags, you can cover up to 1,000 sq. ft., making it a budget-friendly choice if you’re prepared to do the labor.
However, applying German smear requires precision and effort. Achieving an even, natural look requires careful mixing, application, and removal techniques. If you prefer a flawless finish with less effort, hiring a professional will cost between $4–$10 per square foot, depending on your home’s size and brick type.
Step-by-Step Guide: How to Apply German Smear
Step 1: Clean Your Brick Surface
Dirt, dust, and mildew can prevent proper mortar adhesion, so it’s essential to thoroughly clean your bricks before starting. Use a pressure washer or scrub with a stiff bristle brush and soapy water to remove buildup.
Here are some more tips on how to prepare your walls for painting.
Step 2: Mix the Mortar for the Right Consistency
A common mistake is using the wrong mortar-to-water ratio. For a standard finish, mix 70% mortar with 30% water until it reaches a batter-like consistency. If you want a lighter, more translucent effect, add extra water. A thicker mix creates a heavier, more textured look.
Tip: Always test a small section first to see how the mortar reacts before applying it to the entire surface.
Step 3: Dampen the Brick Before Application
Before applying the mortar, lightly spray the brick with a garden hose to maintain your garden too or use a wet sponge if working indoors. This step slows down drying time, giving you more control over the finish.
Step 4: Apply the Mortar in Sections
Using a trowel, grout sponge, or paint roller, apply the mortar from top to bottom, ensuring an even spread. Some grooves and gaps may need extra attention—use a putty knife or piping bag for finer details.
Step 5: Remove Excess Mortar for a Natural Finish
Before the mortar fully sets, use a wire brush or trowel to wipe away portions of the mixture, exposing some of the brick underneath. The amount you remove will determine whether you achieve a light, blended look or a heavily aged texture.
Tip: Work in small sections to avoid the mortar drying too fast before you can adjust it.
Common Mistakes and How to Avoid Them
Applying German smear isn’t difficult, but small missteps can impact the final result. Here’s what to watch out for:
Skipping Surface Cleaning – Dirt or dust will cause the mortar to adhere unevenly, leading to patchy results.
Incorrect Mortar Consistency – If too thick, it will be hard to spread; if too thin, it will drip excessively. Always mix gradually and test a section first.
Over-Applying the Mortar – The beauty of German smear is in its variation. Avoid covering all bricks uniformly—leave some areas more exposed for a natural, aged appearance.
How Long Does German Smear Last and How Do You Maintain It?
Unlike paint or whitewash, which require frequent touch-ups, German smear is a permanent finish that can last decades with minimal maintenance. Because it doesn’t peel or fade, it’s an ideal solution for homeowners looking for a low-upkeep brick treatment.
To keep it looking fresh: Rinse exterior brick with a garden hose every 6–12 months. Wipe indoor brick surfaces with a damp cloth. Avoid harsh power washing, which can erode the mortar.
Newline Painting – A Painting Provider in Melbourne
If your home needs a facelift, our team of experienced, professional Melbourne painters can assist you with all types of painting requirements.
We service both residential and commercial properties – offering our expert advice, painting services and color consultancy to ensure you get the best possible outcome. For more information, call the team at 1300 044 206, or book a free quote on our booking page. Our exterior and interior painting services are available all across Melbourne, including Dandenong, Footscray, Richmond, South Melbourne, and Springvale among many others. If you enjoyed this guide, read other DIY painting articles on door painting and this article on finding the best wall colours to match your timber floors to spruce up your home!
Once you are finished with sprucing up your brick exterior, consider having your driveway or your fences painted next!