As the saying goes: ‘By failing to prepare, you are preparing to fail.’
The same is true when it comes to painting walls. Without giving yourself adequate time for preparation before reaching for the paint brush or roller, you will not achieve the best results and will need to start over.
But, just how do you prepare your walls for painting?
We have compiled a comprehensive guide for painting preparation to guarantee a smooth, professional finish every time.
We understand that investing more time at the start will save you time in the long run, so follow these simple steps to embark on your quest to paint walls like a pro and ensure your walls are prepared to perfection.
 By ensuring that your walls are clean before you start painting will help the paint to better stick to the walls.
A clean surface also prevents stains and marks from showing through the new paint, so you can improve the final results by completing this simple step. Besides, you don’t want to be painting over a dirt or dust-covered wall, as it will appear uneven.
So, the first thing you should do is use a duster or a small broom to remove any dust or dirt from your walls. Once you are satisfied that you have removed all dust from the walls, you can grab your sugar soap.
For a thorough clean, you should create a mixture of sugar soap and water, which you can apply to your walls using a spray bottle. Spray the mixture onto each section of the wall, leaving it for 30 to 60 seconds before wiping it off with a clean cloth or sponge. Make sure to concentrate on the middle of the wall, as this is often the dirtiest part of the wall.
Once you have worked your way down the wall from top to bottom, you should rinse the wall with a clean sponge – rinsing off the sponge in a bucket of clean water between sections to avoid smearing any dirt or grime onto your clean walls.
Finally, grab a clean, dry towel and dry your walls by gently rubbing or wiping them over. If there are noticeable dirty areas remaining on the wall, then give them another clean with the sugar soap mixture before rinsing again.
By ensuring that your walls are clean before you start painting will help the paint to better stick to the walls.
A clean surface also prevents stains and marks from showing through the new paint, so you can improve the final results by completing this simple step. Besides, you don’t want to be painting over a dirt or dust-covered wall, as it will appear uneven.
So, the first thing you should do is use a duster or a small broom to remove any dust or dirt from your walls. Once you are satisfied that you have removed all dust from the walls, you can grab your sugar soap.
For a thorough clean, you should create a mixture of sugar soap and water, which you can apply to your walls using a spray bottle. Spray the mixture onto each section of the wall, leaving it for 30 to 60 seconds before wiping it off with a clean cloth or sponge. Make sure to concentrate on the middle of the wall, as this is often the dirtiest part of the wall.
Once you have worked your way down the wall from top to bottom, you should rinse the wall with a clean sponge – rinsing off the sponge in a bucket of clean water between sections to avoid smearing any dirt or grime onto your clean walls.
Finally, grab a clean, dry towel and dry your walls by gently rubbing or wiping them over. If there are noticeable dirty areas remaining on the wall, then give them another clean with the sugar soap mixture before rinsing again.
What you’ll need
First things first, it’s always important to ensure you have all of your essential tools on-hand before you get started. This will save you a trip to Bunnings in the middle of prepping your walls – which will just slow down the process.Here’s what you’ll need:
- Sugar soap
- Sponge, towel, gloves and a bucket
- Stripping knife
- Scraper
- Filler and filling knife
- Protective sheets
- Sandpaper
- Ladder
- Painter’s masking tape
Before you prep your walls
Before you start to prepare your walls for painting, it’s important to clear out as much furniture from the room as possible. If it’s too heavy to move into another room, then leave it in the centre of the room and cover it with protective sheets to prevent paint splashes. Next, cover the surrounding floors with prospective sheets and apply painters tape to the edges to keep it secure. Keep this painter’s tape on-hand, because you’ll also be using it to cover your skirting board edges, window sills, door knobs, electrical outlets and any other areas you’d like to protect from potential paint spills. Once you’ve secured all of your protective sheets and painter’s tape, then it’s time to do a lap around the room and inspect the walls. What you’re looking for here is any holes, cracks or overly dusty areas that require cleaning before getting started. Once you have done this, then you can start cleaning your walls.Cleaning walls before painting
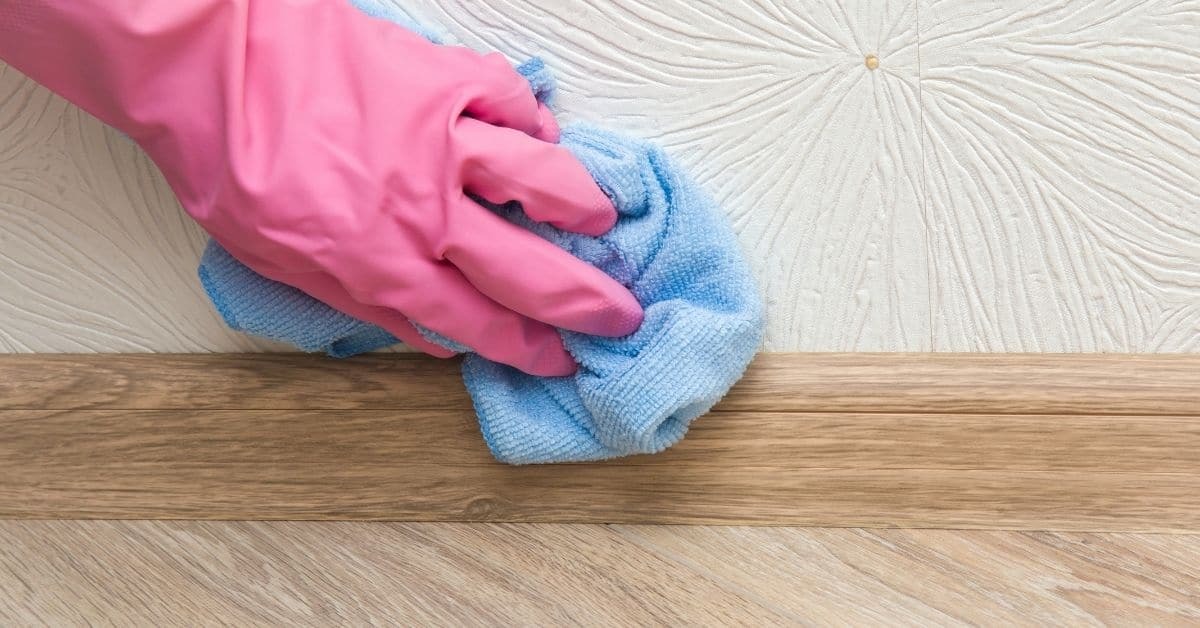
By ensuring that your walls are clean before you start painting will help the paint to better stick to the walls.
A clean surface also prevents stains and marks from showing through the new paint, so you can improve the final results by completing this simple step. Besides, you don’t want to be painting over a dirt or dust-covered wall, as it will appear uneven.
So, the first thing you should do is use a duster or a small broom to remove any dust or dirt from your walls. Once you are satisfied that you have removed all dust from the walls, you can grab your sugar soap.
For a thorough clean, you should create a mixture of sugar soap and water, which you can apply to your walls using a spray bottle. Spray the mixture onto each section of the wall, leaving it for 30 to 60 seconds before wiping it off with a clean cloth or sponge. Make sure to concentrate on the middle of the wall, as this is often the dirtiest part of the wall.
Once you have worked your way down the wall from top to bottom, you should rinse the wall with a clean sponge – rinsing off the sponge in a bucket of clean water between sections to avoid smearing any dirt or grime onto your clean walls.
Finally, grab a clean, dry towel and dry your walls by gently rubbing or wiping them over. If there are noticeable dirty areas remaining on the wall, then give them another clean with the sugar soap mixture before rinsing again.
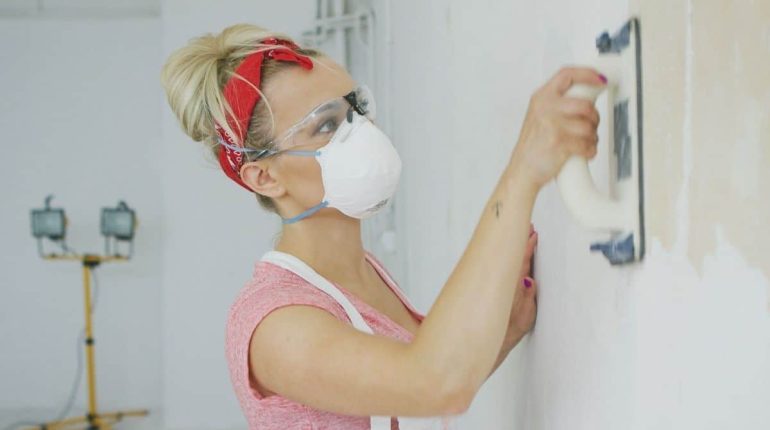
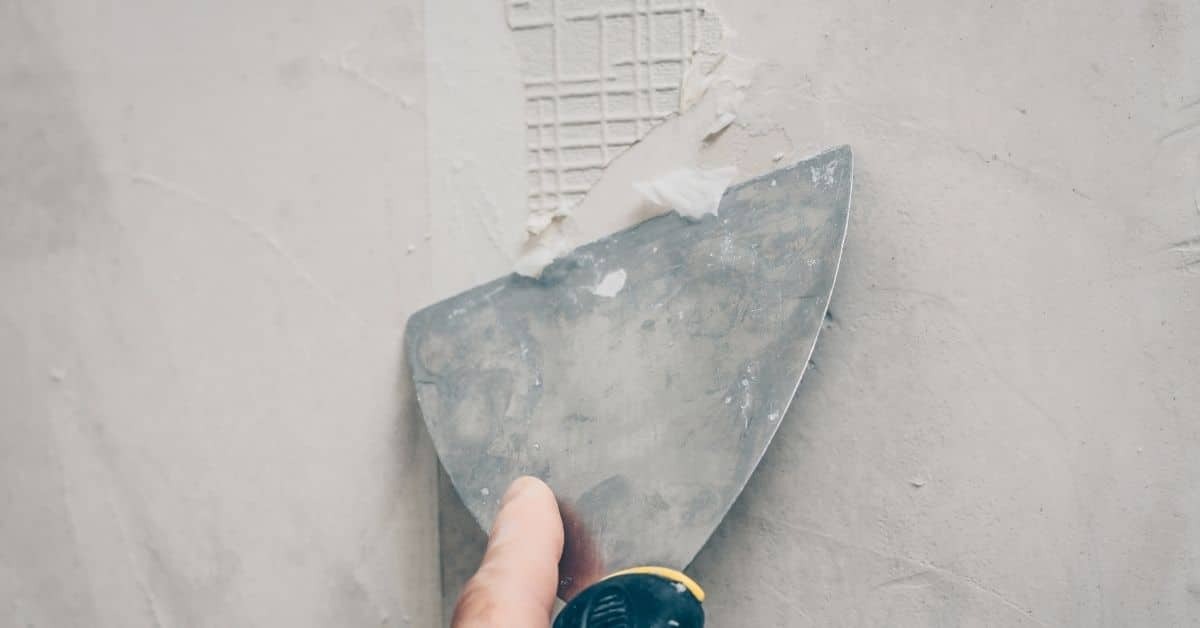
Fill in the gaps (and cracks)